As many of you know, I have been on a mission this year to clean up my overwhelming collection of fabric scraps and undesirable fabric. Some of it is pretty ugly or of bad quality, so I haven't really donated any of it because if I don't think they would make good quilts, then why would I want someone to receive said quilt?
By far, my favorite use of the strips of fabric that are in my bin have been the coiled rope bowls. They are just addicting to make. You can use ANY fabric that is about 3/4" wide and any length longer than 7 or 8 inches.
I have had more than a few people say, "I wish I could make those" or "Can you show me how to make those?". So, I decided to do a quick little tutorial on them.
Supplies:
*Cotton Rope - I like the small macrame cord that is on spools at Joann's but I have heard of others using clothes line from a Home Depot or Lowes or wider/thicker cotton rope.
*Fabric Strips - 3/4"-1" width. Any wider and you end up getting too many wrinkles in my opinion, but this is by no means an exact measurement. I prefer a length around 20". I try to not go less than 7" or more than about 25". Longer than 25" is ok, but it means you are handling the fabric more and end up with more of an unraveled look.
*Glue - I like using a glue stick or just plain school glue (Elmer's or generic). As long as it dries clear. You don't need much and could certainly do without, but I find it makes things a bit easier.
*Clip - I use one of my Wonder binding clips. It helps keep things nice and snug when you are cruising along.
*Purple Thang, pencil, chopstick - basically any kind of pointy, but not stabby thing to reach under your foot while sewing the start of the bowl.
*Sewing machine (of course), thread (matching or contrasting), Zig-zag foot of some sort.

Now that you have all of your supplies ready, it is time to start sewing! But wait!
You should have some idea going in what type of bowl you are looking for. Is it going to be round? Or more of an oval? Is it going to have steep sides?
For your first one, I would suggest just winging it and seeing what happens. It makes it a little more enjoyable in my opinion.
I am going to do my best to explain the process in photos with notes. If you get confused at ANY part of this, please let me know and I will try to edit and correct the steps. :)


I wouldn't worry too much about getting the stitches perfect. Especially on your first few bowls. Goodness knows I don't. What matters is that the stitch catches both sides of the rope.


By far, my favorite use of the strips of fabric that are in my bin have been the coiled rope bowls. They are just addicting to make. You can use ANY fabric that is about 3/4" wide and any length longer than 7 or 8 inches.
I have had more than a few people say, "I wish I could make those" or "Can you show me how to make those?". So, I decided to do a quick little tutorial on them.
Supplies:
*Cotton Rope - I like the small macrame cord that is on spools at Joann's but I have heard of others using clothes line from a Home Depot or Lowes or wider/thicker cotton rope.
*Fabric Strips - 3/4"-1" width. Any wider and you end up getting too many wrinkles in my opinion, but this is by no means an exact measurement. I prefer a length around 20". I try to not go less than 7" or more than about 25". Longer than 25" is ok, but it means you are handling the fabric more and end up with more of an unraveled look.
*Glue - I like using a glue stick or just plain school glue (Elmer's or generic). As long as it dries clear. You don't need much and could certainly do without, but I find it makes things a bit easier.
*Clip - I use one of my Wonder binding clips. It helps keep things nice and snug when you are cruising along.
*Purple Thang, pencil, chopstick - basically any kind of pointy, but not stabby thing to reach under your foot while sewing the start of the bowl.
*Sewing machine (of course), thread (matching or contrasting), Zig-zag foot of some sort.

Now that you have all of your supplies ready, it is time to start sewing! But wait!
You should have some idea going in what type of bowl you are looking for. Is it going to be round? Or more of an oval? Is it going to have steep sides?
For your first one, I would suggest just winging it and seeing what happens. It makes it a little more enjoyable in my opinion.
I am going to do my best to explain the process in photos with notes. If you get confused at ANY part of this, please let me know and I will try to edit and correct the steps. :)
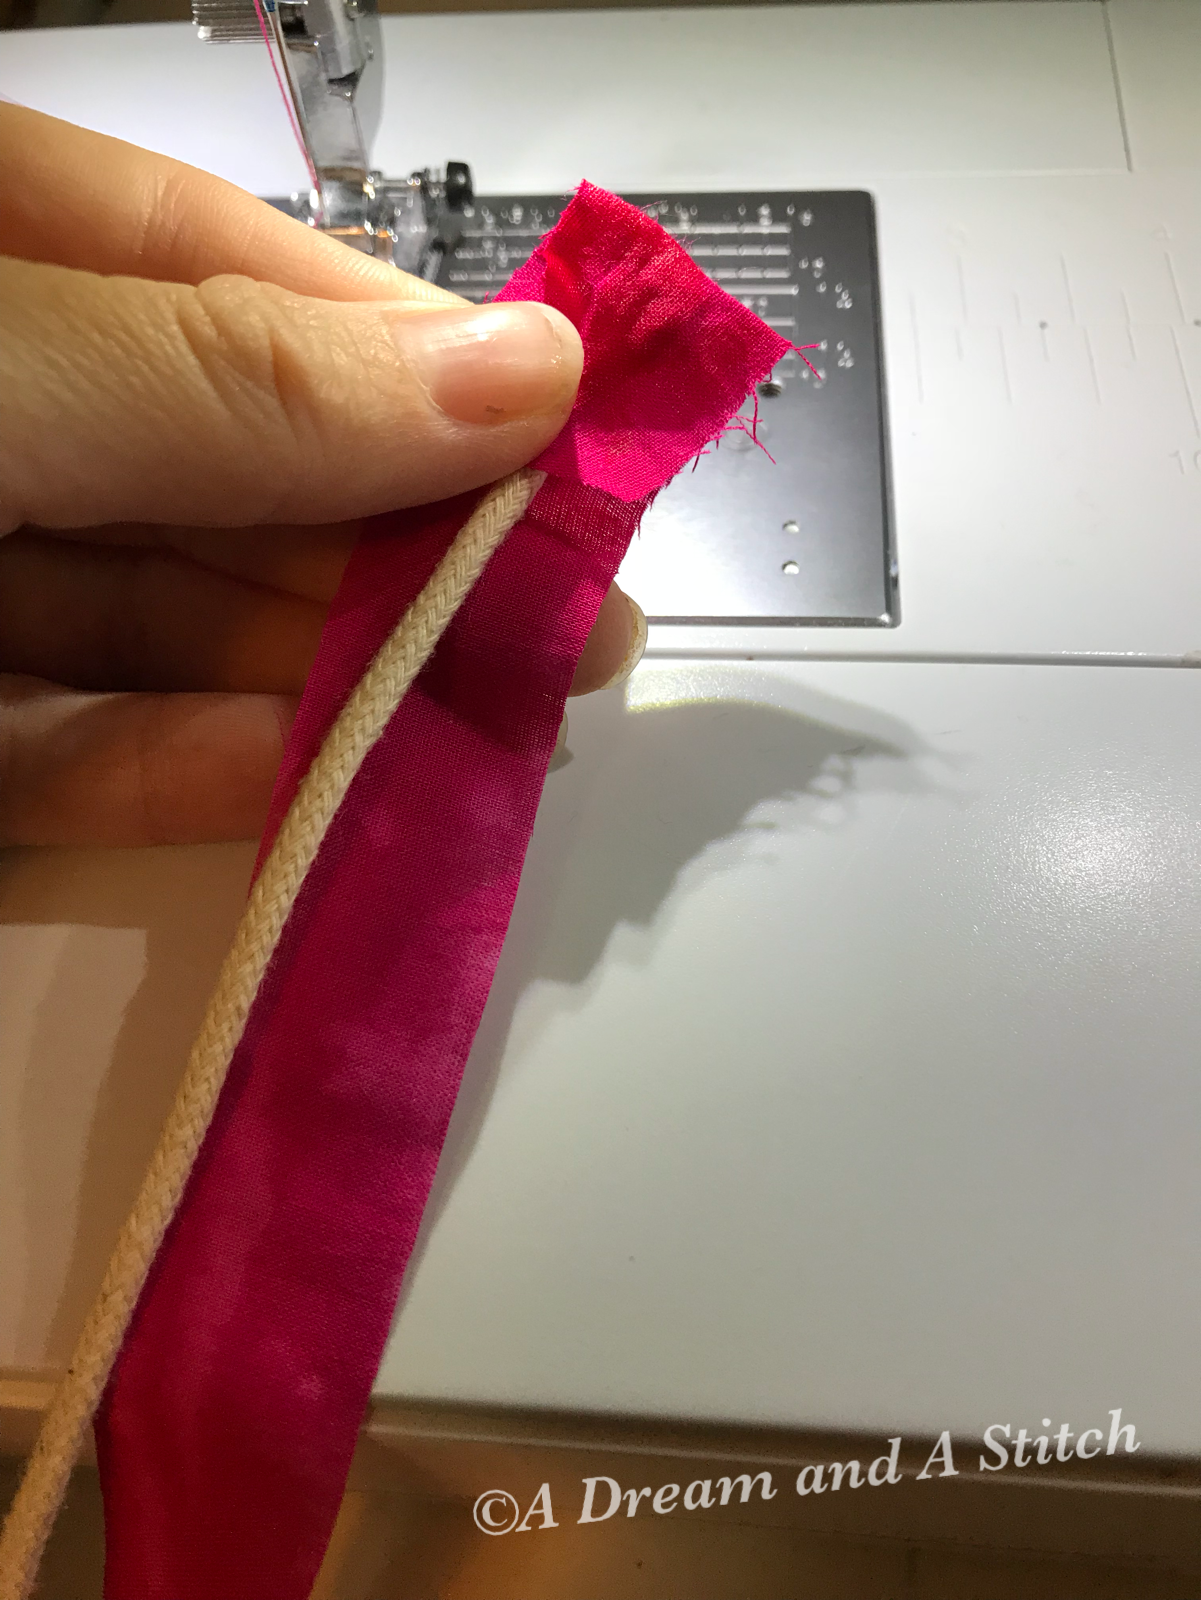
- Put a little glue on the wrong side of the end of the strip of fabric. Fold your strip of fabric over the end of the rope.

- Tuck the corners in and begin to wrap around the rope. Direction only matters on what you end up being comfortable with. I usually go from the right side over the top.

- Make about three rounds of the fabric and clip it down to let the glue set a little. Continue making rounds with the strip of fabric until you have a few inches wrapped. Clip there.

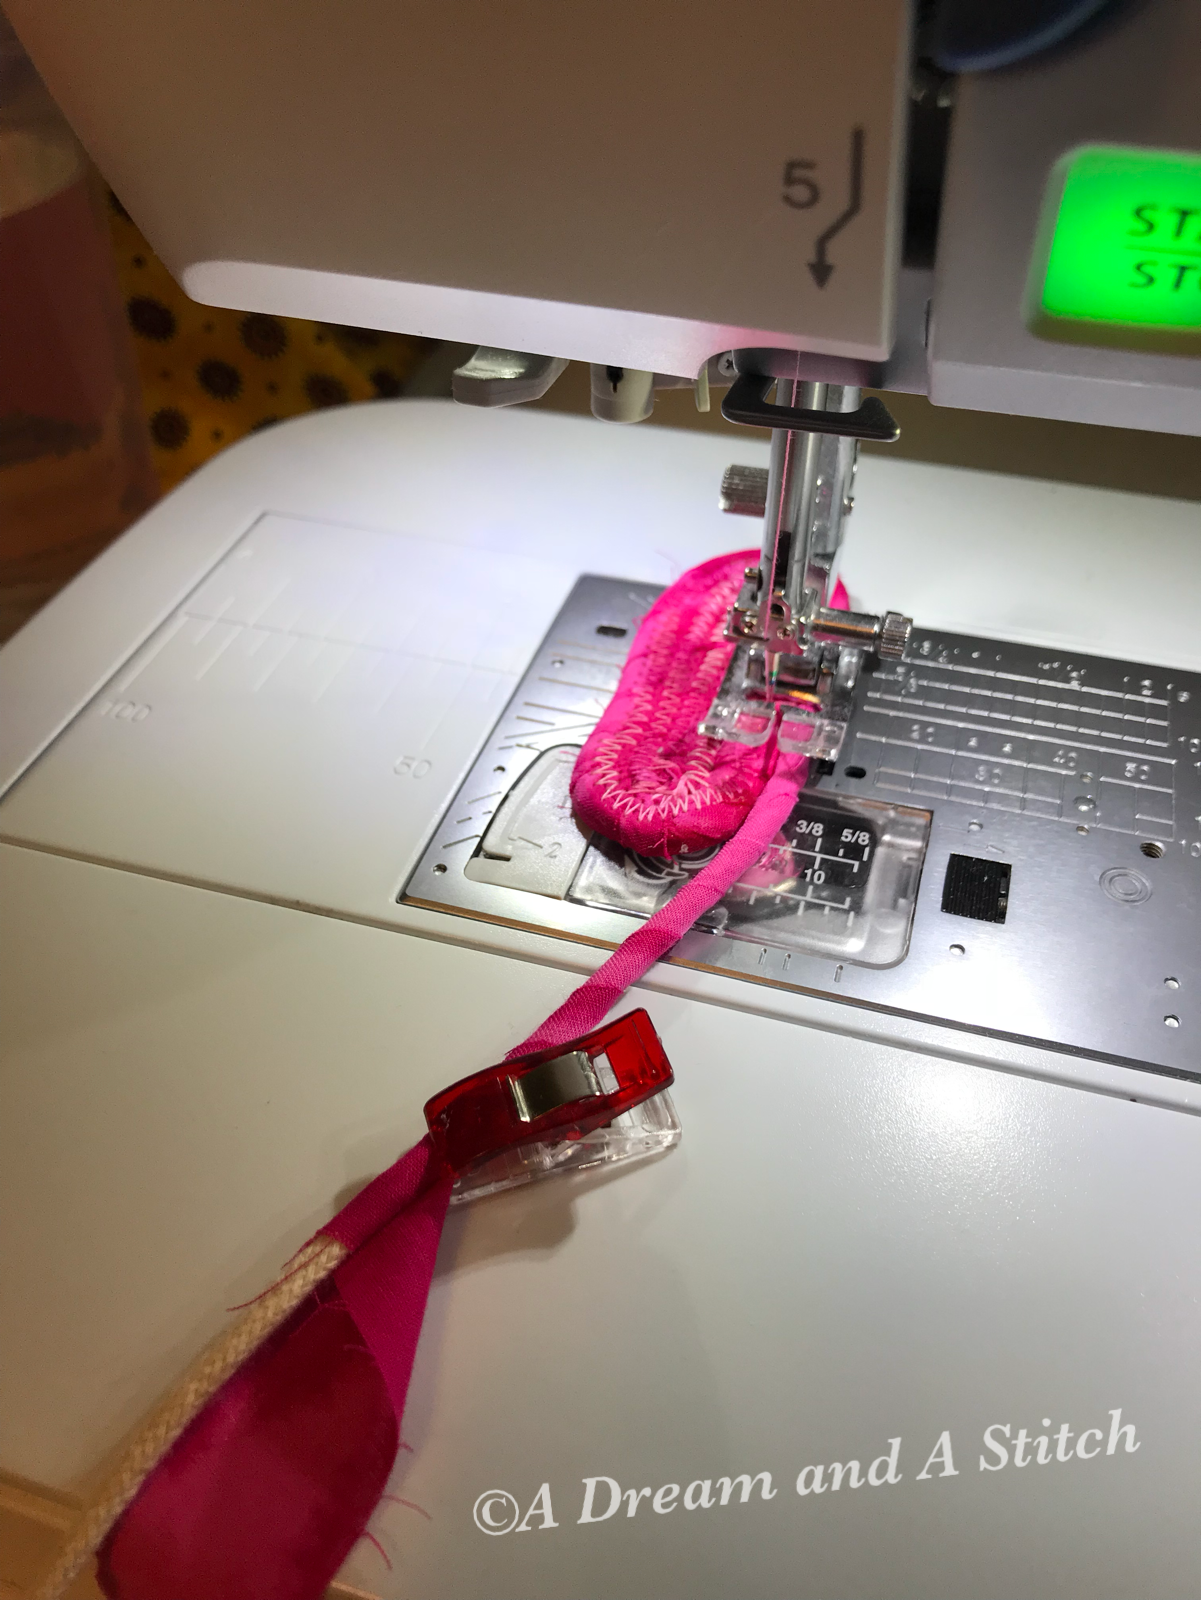
- It is important to start with the loose end of the rope on the outside so your bowl is not stuck under the arm of your machine. Set your machine to a fairly wide zig-zag stitch so it will reach back and forth between two pieces of rope.
- Using your Purple Thang or chopstick, tuck the folded rope under your sewing foot in the shape you want your bowl. The one in the image is a short oval. If you want a circle, it is only a couple of stitches to start and you may want to wind a few rows.
- Be careful on this first set of stitches. The pieces of rope have to be snug against one another so you don't have a hole in the bottom of your bowl. Go slow and use your stick to squeeze them together.
- Then stitch back and forth with the zig-zag catching both sides of rope.

- Continue until you get to the end of the short piece of rope. If you are doing a tighter circle, this may only be 3 or 4 stitches.

- Flip the stitched piece around (it should now be on the outside of your machine). Get the next row of rope snug against the first and repeat. Again, if doing a tighter circle, this will be more finicky now, but more fluid in a bit as the turn will be constant.


- Depending on the length of your strips, you are probably close to the end. Don't let it get TOO close to the needle before you add another strip. Just put a little glue on the wrong side and start wrapping, overlapping the previous piece of fabric a bit. I add a touch of glue to the end of the previous piece as well. Not much is needed. This image shows a bit more than is needed.
- Keep adding strips of fabric and turning your coil under the needle. Slow is good.

- Keep this going until you have the size of the base you want. If you are using scraps or want to change it up, you can alternate different colors of fabric too.

- Once you have the base size how big you want it, you want to tilt the base up. The steepness determines how steep the walls of your bowl are. If you want them almost straight up, then you almost have to put the new rope on top of the coiled rope for a few rounds.

- This type of tilt will give you a bowl that gets much wider at the top and has a gradual slope.

- Continue coiling the rope around the bowl until you have reached the size you like.
- As a side tip: Don't wrap too much fabric ahead of time and be gentle with it. The fabric will fray giving your bowl a more worn, fuzzy look.


- When you reach the end of where you want the bowl to be, cut your rope and leave the fabric a bit longer. (Sorry, I forgot a photo here)
- Then wrap the fabric around the end of the rope just like you did at the very beginning, covering the rope completely.
- You can either sew the end of the rope directly onto the last coil of the bowl or you can make a little loop like I did in the photo, tucking the end piece under and going over it a few times connecting both pieces of rope to the one next to it. I go back and forth a bit just to secure it. - see photo below, but I am still perfecting this part and I am still a little messy with it.

There you go. A finished bowl!
Now try another. They get easier and you will get more creative with the styles.
I would just love to see what you come up with. Share them with me!
Tag me on IG @adreamandastitch!


Great tutorial! I only have a straight stitch machine or I'd definitely be giving this a try. Tips and Tutorials Tuesday linkup opens tomorrow; would you consider linking up?
ReplyDeleteA super tutorial, very clear, and great pics along the way. And, lovely bright pink fabric.
ReplyDeleteYou did a wonderful tutorial, thank you. Maybe after the Holidays I will try one. I started a placemat type many years ago-you notice I said started, LOL
ReplyDeleteWhat a cute bowl. I made one about a year ago and my needle keep breaking. Did not know what I did wrong, but I do love the bowl that I made.
ReplyDeleteWas your rope completely cotton, or did it have a poly core? I broke several needles using the wrong type of rope. Hope you try again. They really are fun to make and definitely use up those thin strips of fabric we all seem to accumulate.
DeleteThis is a great tutorial. Love the step by step pictures. I think I need to try one out after the holidays!
ReplyDeleteOn behalf of the many, many strips of fabric accumulated from die-cutting, thank you for this wonderful tutorial. I am ready to start making bowls after the holiday. Happy Thanksgiving!
ReplyDeleteGreat tutorial, Jen! How long does it typically take you to make one bowl?
ReplyDeleteThese bowls are great for scrap busting. I've made a few bowls and have a ton of scraps. I never even thought about putting the two together to get rid of some scraps. Thank you for the inspiration!
ReplyDeleteWonderful tutorial Jen, great pics and very clear. Now to source some rope in the UK, thank you.
ReplyDeleteGreat tutorial! This is such a go-to project for using up scraps. Thanks for linking up to Wednesday Wait Loss.
ReplyDeleteGreat tutorial, Jen! I did one last summer. Now I want to make another one.
ReplyDeleteVery cool!!! Thanks for sharing this with us. I'm hoping to give it a try soon :)
ReplyDeleteThanks for sharing valuable post
ReplyDelete